These are the slides for a talk that I did October 29, 2022 for the New England SynthFest 2022.
Do That Live Performance! Tips, Tricks, and Encouragement
Leave a reply
These are the slides for a talk that I did October 29, 2022 for the New England SynthFest 2022.
Trigger Fyre is a pretty nice tool to fire off image macros on your stream. You can link it to a stream redemption and make images appear that are fun for your viewers.
There are a pretty large number of tutorials for how to step up Trigger Fyre with your stream. I won’t go through that in detail. I want to talk about about troubleshooting.
Your movie file isn’t compatible with your browser. (OBS doesn’t support H.265, for example.)
In my case, I was saving MP4 files using H.265 encoding (HEVC). OBS Studio only supports H.264 (AVC). HEVC encodings are higher quality and smaller, but they won’t play in OBS Studio.
OBS Studio uses CEF, which is based off of Chromium. It’s hard to find a list of what movie formats CEF plays, but I’ve confirmed that I can play back MP4 files that are encoded with H.264.
Your cache is out of date. OBS has a way to reset the cache of your current page.

If you do want to fire off images or movies using Trigger Fyre for your Twitch stream, here’s my quick text tutorial.
If people want a more detailed tutorial, I can create one but there’s a lot of tutorials out there so I didn’t feel like I had to create a while new one.
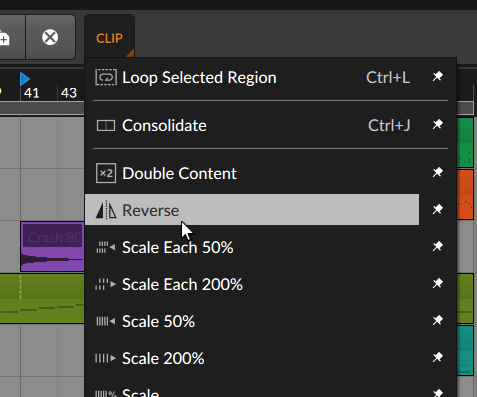
Here’s how to reverse audio in Bitwig:
Not everything needs to be a five minute YouTube video.
Here’s a rather insidious problem I encountered this weekend. YouTube wouldn’t play videos – it wouldn’t play ads, it would just spin like below:

The strange thing is that it happened on my Mac Mini (2018) with Big Sur with Twitch and YouTube, it happened on every browser, it didn’t happen on my other Macs, and it didn’t happen on any of my other devices. I actually spent over two hours with Apple Support as they walked through everything they could think of, from resetting SMC and NVRAM and browser settings. The problem didn’t go away until we did a refresh reinstall of Big Sur.
But then this issue happened on my old Catalina iMac (early 2013) as I was setting up audio. I was suspicious that it wasn’t an installation issue and that it was some kind of setup bug.
If you do pro audio on your Mac, or if you do streaming, you might have created a “Multi-Output Device” to use multiple audio interfaces simultaneously. Turns out that the order in which you enable these matters and that you need to enable them in the right order. I can’t tell you right now what the right order is, but I can tell you how you can diagnose this.
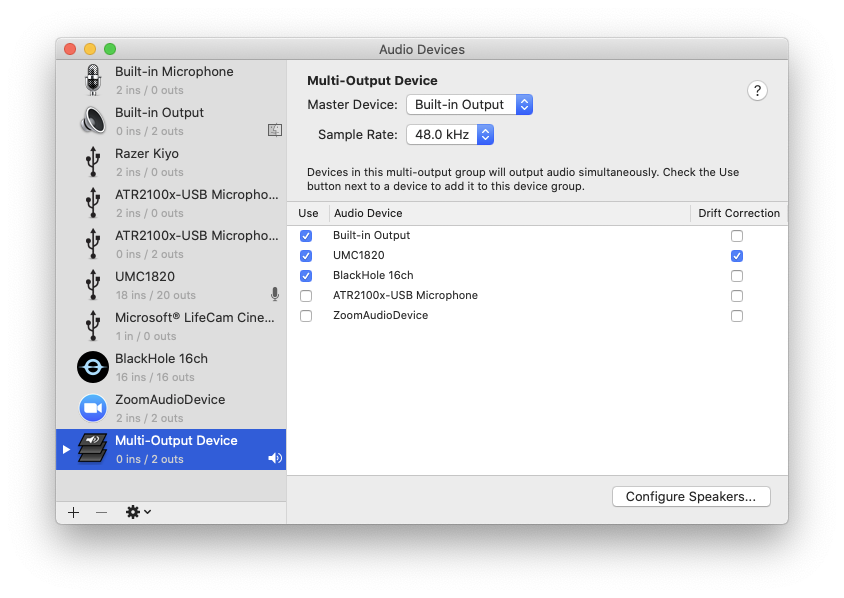
So if videos aren’t playing in Safari, or any other device, and you’ve enabled Multi-Output Device, then check this setting. Hopefully this will solve issues with online videos not playing on your computer!

Let’s say you need an instrument that will play back recorded effects, slice drum loops into segments, automatically shift the pitches of sound so they’re always in key, and cut out bad “pops” other undesirable parts of a sound. Oh, and you also want it to play cool gating effects. What instrument would you use? The answer, of course, is a sampler. A sampler loads up recorded audio files and does some basic processing on them so that you can use them as an instrument.
I’ve never really been big into samplers. I started doing music after trackers were going out of style but before scripted sampling engines became big. As a result, I never really paid much attention to the “simple” sampler where you dropped in a sound file and had it play it back for you.
I want to walk you through using a sampler using Logic Pro X’s “Quick Sampler” because it’s, well, quick. The Quick Sampler was released as part of Logic’s 10.5 update and it’s fast and easy to incorporate samples into your music composition! However, even though the instructions here are specific to Logic, almost all samplers support these concepts.
Drag and drop the sound directly from the Finder into the track header. Release the button and it’ll give you an option for what to do with the sample:

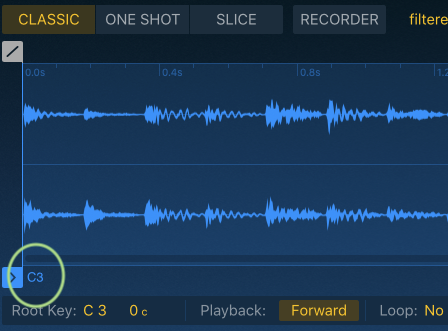
You can audition your sound with the tiny little play button under your sample, or you can use the piano roll and play the sample back (the default note is C3). For most sounds, the sound will play back as long as the note is held.
One of the great features of samplers is making the sample work across all kinds of different pitches and with all kinds of note lengths. You can change a quick snappy trumpet note into a long drone or pitch a really low-pitched sax into a high-pitched sax.
Load your sample and set it to “Classic” mode. The short version of how this works is that the sample plays as long as the note in the piano roll is held down (the longer answer is that the sample follows the amp envelope). Next, look for the loop points. If you hold the note down for longer than the sample’s length, then the sampler will loop across this range.
To make the loop sound good, you don’t want clicks or pops when you go from the end to the beginning. This means that you generally want the loop points to hit a point called a “zero crossing” (which is represented by the line). Fortunately, Quick Sampler makes it pretty easy to snap the loop points to zero crossings. Under “Snap”, choose “zero crossing”. Next, you want to set your loop so that the sound is as continuous as possible. To do that, you can zoom in on your sound’s waveform and imagine that you’re drawing a line from the end back to the start without an abrupt change in direction.

The following video demonstrates some of the differences in the sound when you don’t snap to zero crossings, when you don’t match the waveform’s direction, and when you do line everything up.
If you want your sample to always play back in its entirety, then use “One Shot”. This is best for drum sounds or sound effects where you always want the entire sound to play.
A long-standing music production technique is harvesting drum loops from recordings, slicing them up, and then using them in different ways in your own music. This is not only fun, but it allows you to get some really interesting effects.
If you want to play each drum hit separately, you can use the “Slice” option in Logic. When you click it, it automatically cuts your tracks by transient and assigns it a note, and then you can use the note to play back each piece. Here’s a filtered hi-hat loop you can use to follow along with.

You can choose different ways for Quick Sampler to automatically cut your track up:
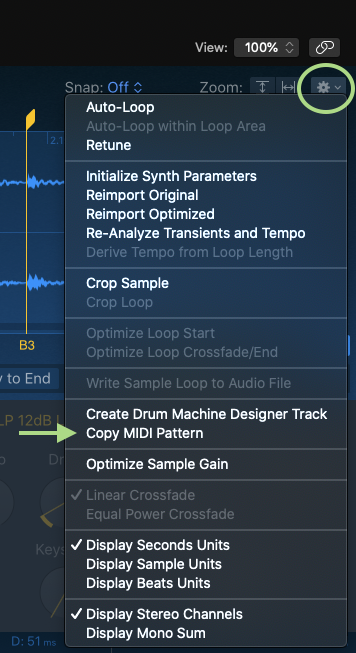
In each of these cases, you can use the gear menu to copy the MIDI pattern and paste it as a region on your track. When you play it back, it should sound like the original.
With the region, you can move MIDI notes around to play the different hits in unique ways or even to gate parts of a sample! In the example video below, I use this technique to chop up a vocal.
I’ve been talking a lot about how to load and manipulate samples that you already have, but what if you don’t have any suitable samples to work with? The Sampler makes it easy to create your own!
Using Quick Sampler’s “Recorder” mode, select an input source (which could be from your audio inputs, but it could also be from an instrument track in Logic). Press the red “record” circle, and then play the sound in the DAW. You’ll see the audio come through into the sampler. Press “Stop”, then select an appropriate mode for playback. You will likely need to edit the start and end points of your sample (hint: if it’s a loop, you might find Snap: Beat helpful).

Why would you resample from your DAW when it’s already playing the sound? The cool thing about resampling is that you can chop up the result for some very interesting effects. Resample your voice and pitch it up or down for some robotic dystopia. Slice a loop up to gate and glitch it. Record some drums with huge reverb, but then gate the reverb out. There’s a lot of interesting things that you can do with samples even directly in the sample editor.
When you load a sample into Quick Sampler, it asks if you want to use Original or Optimized mode. What’s the real difference? Optimized mode will attempt to auto-detect the nature of the sound and then tailor the sampler’s settings based on what it thinks works for the sound. It will:
In addition to manipulating the sample itself, you can modify a number of pitch, filter, and amp envelope options. You can use these to creatively shape the sample to your needs! If you want a lush pad, for example, you could increase the attack on the filter envelope and increase the amp envelope release.
The sampler also contains a number of modulation options. Access the “Mod matrix” to see a list of possible controls, then map them so that you can control them from the piano roll or your MIDI controller.

Now you know more than enough to have fun with your samples. I like Logic’s Quick Sampler because it’s so easy to get started, but pretty much every DAW, and even hardware sampler, uses the same concepts in this post. From slicing to ADSR to zero crossings, you’ll be able to figure out any sampler!

Have you ever wanted to write your own pieces of music? It’s easier to start learning music composition than you might think.
I’m a mostly self-taught composer, and I’ve never learned to play any instrument well enough to be proficient at it. I remember wanting to learn how to compose songs in 2003 and then getting stuck with thinking about the tools required and the skills required. I used to think that you needed to learn music theory, and that you HAD to learn to play with a piano keyboard.
You do not need to know any of that to compose! These days, with digital tools, you can start writing basic songs with only a mouse, and listen to them immediately to see if you like what you hear. I’m going to help you get started with composing just enough so that you can try a few things on your own and get some experience so that more advanced tutorials make sense.
I used to think that you needed to learn music theory, and that you HAD to learn to play with a piano keyboard. You do not need to know any of that to compose!
I’m going to assume that you are using a digital audio workstation (DAW) such as FL Studio, Garageband, Reaper, Ableton Live, or Logic Studio. There are many guides about how to choose a DAW, so I won’t cover that topic and focus primarily on the art of composing itself.
The first thing to be familiar with when composing is the layout of the piano keyboard and scales, even if you don’t plan on ever learning piano. This is because almost every DAW uses a piano roll to represent notes, where a piano is on the left. That said, if you’re just starting out, the only notes you need to worry about right now are the white keys. Horizontally, you can see when the note starts, and its duration. The numbers across the top represent bars (you can see 1-2-3-4). The smaller grid lines are subdivisions. A whole note covers one bar. A half note covers half of the bar. A quarter note covers a quarter of the bar. An eighth note covers 1/8 of the bar.

For creating melody, learn two scales: the major scale, and the minor scale. The major scale is essentially do-re-mi-fa-so-la-ti-do and can be played on the white notes starting with C to make “C D E F G A B C” (C major scale). The minor scale is played on the white notes starting with “A” (two white notes below C) and goes “A B C D E F G A” (A minor scale).


For most melodies, if you riff on the white keys, and either start, or end the melody on “C” for major, or “A” for minor, then you’re going to get something that cannot be out of key and will probably sound fine.
For creating harmony, you will want to learn chords. A chord is made of three specific notes played at the same time. For the raw basics, you would want to learn the 1 chord, the 4 chord, and the 5 chord. Once you get used to those, add in the 6 chord. Here’s a chart for what the chords are for the C major scale and the A minor scale.
| Chords for C major | Chords for A minor |
| I chord: C-E-G (C major) | i chord: A-C-E (A minor) |
| IV chord: F-A-C (F major) | iv chord: D-F-A (D minor) |
| V chord: G-B-D (G major) | v chord: E-G-B (E minor) |
| vi chord: A-C-E (A minor) | VI chord: F-A-E (F major) |


Using the 1-4-5 chords, a nice chord progression across four bars is 1-1-4-5. You can try many different variations of this, like 1-1-5-5, 1-4-1-5, and so forth. If you add the 6 chord, you have the harmonic foundation for a gigantic number of pop songs with the I-V-vi-IV progression.
For rhythm, learn some basic drum patterns. A basic to start off would be:
If you have this, the next step is to sit down at the DAW and start writing. Choose some instruments that sound good to you. Good choices are piano and square wave synth sounds because they sound good across many octaves.
A solid template to start your composition from would be:
Play your melody in the melody line following the major or minor scale. Play the harmony in the midrange track and assign it a chord progression of your choice. For bass, you can usually draw the lowest note from the corresponding chord, make it short, and then repeat it and move it around for some groove. Copy and paste this and add a few variations.

Now you’re composing!
Eventually, you’re going to grow out of this template. You’ll start using open hi-hats, breakbeats, syncopated rhythms, jazz harmonies, crazy stacked synths, three kick drums, alternative modes, an entire orchestral string section with borrowed chords, and more. But when you’re just starting out, I like to give people a relatively constrained set of parameters to work with initially because it helps you get something down on the paper. Once you get it down and you can press “play” and hear something that sounds not too bad, you can start making tons of variations and basically start having fun overall with it.
I like to give people a relatively constrained set of parameters to work with initially because it helps you get something down on the paper.
When you are writing, your first few songs will sound bad. They won’t be epic like Howard Shore or floor-busting like Skrillex. Just accept it. Actually, to be honest with you, when you first start out, your first few songs are going to sound AMAZING and you’ll want to show all of your friends, but then you’re going to realize just how wrong you were about it half a year later.
The point is, it takes a lot of practice if you want to make songs that sound like your favorite songs. This is where analysis and theory comes in – you also want to know how to listen and study existing music and put it into a framework where you can put it on your page. You will get there eventually. Until then, embrace making music that sits within your own parameters until you get the skills up. There’s a lot to learn, but it’s also important to have fun with the process!
As you learn the skills, you need an opportunity to practice them regularly, in a way that is encouraging and motivating in order to get good.
I highly, highly recommend that you Join a community where you can compose, share your work, and get feedback. I plug One Hour Compos a lot for new and experienced producers alike. The compo starts at 9:00 P.M Eastern time and runs for a little over an hour, and then everyone listens to the songs afterward and comments in real-time. This is extremely valuable because it’s not a huge time commitment, you get to practice, and you get real-time feedback from the ThaSauce Network Discord. In addition, since you’ve only spent an hour on it, no one has any expectation that what you’ve created is complete or polished.
There’s lots of variations of this (Two Hour Track Sunday, WeeklyBeats, Weekly Music at streak.club, Mix Challenge, 90 Minute Compo, etc.). No matter what you’re doing, if you’re doing it every week, and you have people listening to your work and leaving you their impressions, you’re going to improve much faster than if you’re doing it on your own.
If you’re doing it every week, and you have people listening to your work and leaving you their impressions, you’re going to improve much faster than if you’re doing it on your own.
What happens next? First, create some music. Get used to the process of choosing some instruments, writing some notes on the page, and listening. Compose some melodies, listen to how the different chords and rhythms sound, and learn how different instruments sound. Join compos like One Hour Compo. Ask me questions in the comments and let me know about topics you want to learn more about. Not everything is going to sound good. That’s okay. You’re learning a new skill – one that takes many hours to develop! Remember that it’s about the journey – your journey – not the results.
When you start getting comfortable, a good next step is to start learning music theory to form a foundation from which to understand more music composition concepts. There are a lot of resources out there, but I particularly enjoy Hack Music Theory for its simple explanations, its solid foundations, and easy-to-apply techniques.
I really enjoy talking about music composition and music technology. You can reach out to me on this blog or through Discord (EmeraldArcana#7200). Check out my compositions on my YouTube channel!
Warframe is free-to-play online action-adventure video game for various platforms. You play the role of a Tenno (essentially a space ninja/warrior) defending the world against numerous factions. Because the game is free, its revenue stream comes from players purchasing cosmetic items, weapons, and “frames” using a currency called “Platinum”. Such games rely on being engaging for new players because players who play the game are more likely to keep playing and therefore spend money; all of this is relevant from a UX perspective. I reflect some of my experiences that I had as a new player of the game. I originally posted this on the Warframe subreddit.
Hi everyone, I’m a new player and I’d like to report what it’s like as a new player to figure out how Warframe works and how it plays. I thought I’d write about this because I enjoy learning games. I’m also a user experience specialist so this kind of reflection just comes to me.
I wanted to find a new co-op PC game to play with my partner after I was done with Overwatch. We narrowed it down to Warframe (“space ninjas”) and Destiny 2. Eventually we decided on Warframe because posts online comparing the two described Warframe as having more RPG elements, which appealed more to my partner. We’ve both been playing games for a long time, but lean toward RPG and adventure games.
I’d like to highlight the following main stages and “ah-ha” moments for learning Warframe in roughly the order that we discovered them. We’ve been playing for 20 hours of missions (35 hours in the actual game) and have done about 120 missions together. We also know two friends who play and play with them as well; ironically, they actually didn’t introduce us to the game and we found out after playing for about a week and a half that they played. We’re enjoying ourselves, but I did have a few moments when I was like “I think I get what this game is doing” and wanted to stop. I’ll talk about this below.
Here are the main activities I really had to unpack.
The game does a pretty good job with the basic controls in the introductory missions. I’m sure that this is pretty familiar to most players, so I won’t go through it too much.
There were a few things that I did not learn from the basic tutorial and had to learn them on my own, or from others:
What I mean by “game loop” is the series of activities that you do in a sitting. In Warframe, it’s “go on mission”, “collect loot”, “go back to ship”, “upgrade your stuff”. There’s actually a lot to unpack here so I’ll go through it roughly in the order that I experienced it.
Story. Story is one of those things that gets you playing and keeps you motivated. You don’t know that much about the world after the first mission, but there’s enough of a narrative that makes you wonder, “What’s next?” Unfortunately, you figure out pretty quickly was that Warframe feels like it has no story. Now, I think this changes (apparently there are some really interesting story quests later in the game) but we’re 35 hours in game and there isn’t really anything to talk about, story-wise. That doesn’t mean that the game doesn’t have lore – there’s plenty of that that we can see in the Leverian and Nightwave, which are nice touches.
Star Chart. For a new player, Navigation menu is extremely confusing because I literally didn’t know what anything was.
First, you don’t know what the destinations really do. I think we selected Cetus as our first destination and then realized pretty quickly that it was a town. We talked to Konzu and started the mission, but when it dumped us into single-player mode, we panicked and bailed. I think my partner got one-shot by mobs in the Plains of Eternity at night – later we reasoned it was probably Eidolon analyzers. Definitely not a great first impression. A similar thing happened with Fortuna. We went there but the single-player mission destroyed our MR0-ranked rear ends. I think we came back at MR3 to do it and it still killed me two or three times.
Second, there’s a lot of mission types and their purpose isn’t really clear. There’s the Conclave stuff (which isn’t explained), Ghoul purge, Invasions, Scarlet Spear (I still don’t know what this is), there’s some Voids (which the game eventually teaches you), there’s some bonus stuff for skins (we tried one but were too low level and died).
We did eventually figure out how to select missions on the star chart. and selected a few mission types to go on. Our first mission together was a Defense mission against the Grineer. Then we did one against the Corpus, which was actually pretty cool. At some point, we realized that there was a portal to Venus that you had to open up and that it had mission requirements. The game doesn’t tell you this. It would have been nice for the game to give you an initial goal.
As a new player, you actually don’t really know what the reward are yet. I think initially, it’s the fast-paced action. Parkour is a lot of fun and you quickly learn that you can fly around levels and kill things really quickly. However, that wears out pretty quickly as a reward in itself since most of the initial levels on Earth and Venus are pretty simple.
The next level to draw you in, then, is getting new stuff to play with. This is where the game can fall short with respect to a new player experience.
Weapons are difficult to understand. Though the game explains that there’s a Market, it doesn’t do a lot to explain what you can buy. It was through some confused exploration that we realized that you generally had to buy blueprints, craft items, and then you’d get to use the weapon. It was also through some exploration that I realized that some weapons (a very small number, actually) could be bought with credits. It does present to you the concept of Platinum early and it’s easy to figure out it that Plat is the “real money” currency.
At Mastery Rank 2, I recall looking at weapons and the only ones being available being the MK1-Strum, the Boltor, and the MK1 fist weapon. I was unfortunately misled by guides on the Internet that said that MK1 weapons were inferior, so I opted not to spend my hard-earned credits on them and instead managed to snag myself a Furis pistol. I also observed quickly that many of the weapons that you already used MK1 versions of (like the Paris and the Bo) couldn’t be crafted until much later in the game (more on this below).
It felt like a significant amount of variety of the game was being locked out. I think we had played for about 2-3 hours and I was actually telling my partner, “I think I understand this game, we can play something else” because I had been using my first Warframe, my first primary weapon, and my first melee weapon for the entire game so far. Imagine playing an FPS shooter and for the first few hours, only having access to one load out. In fact, 122 missions in, my most-used primary weapon is STILL the MK1-Paris (32.1%) and the MK1-Bo (45.6%). It would be a huge improvement in the game if it made it clear how you could acquire new weapons. It improved my interest in the game dramatically when I discovered how to buy a Furis and Braton at MR2 and then even more when I got my second rifle, the Boltor. There are only a few items that are easily craftable before you get to Phobos, which is a pretty limiting factor considering how many hours it takes before you get to that point.
Warframes are REALLY difficult to craft. Often, people say, “Don’t spend Plat on Warframes”. I actually wonder how many players who are brand new spend Plat on Warframes (or quit before reaching Venus) because the game makes it really hard to get Warframes without help.
I’m about 20 hours of missions and I still only have two warframes (Mag and Ember, which I got for free with Twitch Prime). I suspect that I would have quit the game by now if I didn’t get get Ember for free. My partner wouldn’t have been able to get a second warframe if it wasn’t for help from friends.. I think that this is a major gap in the new player experience: the fact that it’s so difficult to get your second Warframe. What about the common recommendations, though?
Are you really expected to use your starter Warframe for the first 10 hours of gameplay? For a while, the game was boring because the various missions weren’t really that challenging – it felt like you just either cut down mobs as quickly as possible or that you ran from Point A to Point B as quickly as possible. However, getting different Warframes really changed that and it adds a lot of this “gotta collect them all” aspect in addition to the changes in the basic gameplay that’s a lot of fun.
As with many games of this type, the social aspects saved this. Specifically, the fact that we had friends who could help us probably singlehandedly kept us playing because they were able to provide the game variety that we were looking for by helping us farm for materials.
Our friends who played Warframe weren’t exactly low – something like MR13 and MR17. After my partner mentioned that she was bored of Volt, one of them gifted my partner Octavia, which totally renewed her interest in the game. They also helped us farm Orokin cells and Control modules (both are essential to craft Oberon, which is one of the earlier blueprints you can get), Nova, as well as nano-spores (for weapons). Suddenly, I had a new melee weapon and actual choices for primary weapons and the game opened up dramatically.
Now at this point some people reading are probably like “Duh, it’s an MMORPG, you’re supposed to make friends.” At the same time, very little about the game’s introduction introduces you to the social aspects. Since we were playing two player, we played with each other only and didn’t PUG any missions. The game doesn’t teach you how to use chat. When you get a message from other players in your Inbox, there’s no way to respond. Even if you become aware of other players and trading, it’s hard to become aware of how to ask players for help especially if it’s farming for materials (and many people don’t like asking favors of strangers anyway). Essentially, if you never go to capital cities, it’s possible to go through the entire game without seeing other players.
Warframe is a solid action game with a lot of lore and variety, but it’s buried underneath an overwhelming set of available activities that feel really monotonous unless you either figure it out yourself, or ask someone to teach you. I think that if the game did a slightly better job of making more variety available and introducing new players to the social aspects, it would really smooth out the experience for everyone. Once you get a good sense of how junctions and main story quest work, the player ends up being able to make their own goals and play the game how they want to, but it takes a fair amount of context and comprehension to get to that point. I acquired a mental model of how the game worked mostly through talking with friends and through some experimentation and talking it through with my partner.
I think we’re into it though. I just spent my first real dollars on the game and hopefully will be able to enjoy it for the foreseeable future even though there’s a long way to go to get where everyone else is doing stuff. If you enjoyed reading this and want to say hi, feel free to reach out. My name is “emeraldarcana” also in game. I’m trying to get more warframes now – tomorrow evening, I’ll have Nova and I’m super excited.
There’s an annual challenge called “National Solo Album Month” that challenges musicians to compose and release a solo album in the month off November. It’s based off of NaNoWriMo, “National Novel Writing Month”. An album is defined as having 29:09 of content (because that’s the shortest album released by a label that they have found).
I did the challenge this month and released my album, “Daily Routine” on Bandcamp. You can listen to it at https://irwink.bandcamp.com/releases!
The album itself is an improvisational album of techno and house beats that focuses on groovy rhythmic patterns, evolving musical textures, and minimal melodies. If you like that kind of stuff, check it out.
The album was composed using hardware synthesizers. I primarily used my Eurorack modular synthesizer, a Roland TR-8s drum machine, an Elektron Octatrack performance sampler, and an Elektron Analog Four multitimbral analog synthesizer. I also played melodies on the Linnstrument. For most of the songs, I composed a bassline, some backing tracks, and the drums, and then played them on the sequencer while adding lead melodies with Linnstrument playing a part of the Analog Four. Most of the songs are improvised, so they’re a little unstructured but are meant to convey a mood consistently through the whole song.
I created a video to illustrate the use of the Squarp Instruments Hermod Modular Brain. This is a multi-sequence, polyphonic sequencer for Eurorack that interfaces with MIDI, USB, and CV made by the creators of the very popular Pyramid. Check it out!
I also have a more detailed video that goes into how Hermod’s step mode and zoom levels work.

CARBON by Kilpatrick Audio
I recently purchased a Kilpatrick Audio Carbon made by Kilpatrick Audio. The Carbon is a multi-track, multi-step sequencer that controls instruments using MIDI and CV. So far, it’s been fantastic and it’s allowed me to start doing loop-based music live.
I’ve been communicating with the author, Andrew Kilpatrick, about some bugs about the device, and he recently released a new firmware update. He doesn’t have a Mac so he’s not able to test the Carbon’s firmware updating process.
For all of you visiting who have a Carbon that needs updating, here’s the instructions for Mac (they’ll also work on Linux).
The Carbon uses DFU for its firmware updates. There are many DFU utilities out there, but an open-source one that works is called dfu-util, which runs on Mac and Linux. (If you’re using Windows instead, instructions exist on the Kilpatrick Audio firmware site).
1. (on macOS) Install home-brew (http://brew.sh). You’ll need Xcode for this (with the command-line tools).
2. (on macOS) Install dfu-util. “brew install dfu-util”
On Linux, the instructions will be different, but will probably involve using your system’s package manager in a similar way.
Download and unzip the firmware from the Kilpatrick Audio firmware updates web site. The latest firmware as of writing is v1.06.
Restart Carbon in firmware update mode. To do this:
The LEDs will be a solid color and the screen will be blank. Sometimes, the LEDs will be different colors. That’s normal.
Open Terminal (macOS) or another command-line window.
In the prompt, type the following to check that the program can see your carbon:
dfu-util —list
Your output will resemble the following:
dfu-util 0.9

Copyright 2005-2009 Weston Schmidt, Harald Welte and OpenMoko Inc.
Copyright 2010-2016 Tormod Volden and Stefan Schmidt
This program is Free Software and has ABSOLUTELY NO WARRANTY
Please report bugs to http://sourceforge.net/p/dfu-util/tickets/

Deducing device DFU version from functional descriptor length
Found Runtime: [05ac:828d] ver=0118, devnum=8, cfg=1, intf=3, path="20-6.3", alt=0, name="UNKNOWN", serial="UNKNOWN"
Found DFU: [0483:df11] ver=2200, devnum=27, cfg=1, intf=0, path="20-4.1.2", alt=3, name="@Device Feature/0xFFFF0000/01*004 e", serial="376837513335"
Found DFU: [0483:df11] ver=2200, devnum=27, cfg=1, intf=0, path="20-4.1.2", alt=2, name="@OTP Memory /0x1FFF7800/01*512 e,01*016 e", serial="376837513335"
Found DFU: [0483:df11] ver=2200, devnum=27, cfg=1, intf=0, path="20-4.1.2", alt=1, name="@Option Bytes  /0x1FFFC000/01*016 e", serial="376837513335"
Found DFU: [0483:df11] ver=2200, devnum=27, cfg=1, intf=0, path="20-4.1.2", alt=0, name="@Internal Flash  /0x08000000/04*016Kg,01*064Kg,07*128Kg", serial=“376837513335"
The Carbon’s device ID is 0483:df11. In this particular case, you want to write to the “alt bank 0”, which is the Carbon’s internal flash.
Install the firmware with the following command:
dfu-util -a 0 -D K66-carbon-1.06-firmware.dfu
You will see output that looks like the following:
dfu-util 0.9

Copyright 2005-2009 Weston Schmidt, Harald Welte and OpenMoko Inc.
Copyright 2010-2016 Tormod Volden and Stefan Schmidt
This program is Free Software and has ABSOLUTELY NO WARRANTY
Please report bugs to http://sourceforge.net/p/dfu-util/tickets/

Match vendor ID from file: 0483
Match product ID from file: df11
Deducing device DFU version from functional descriptor length
Opening DFU capable USB device...
ID 0483:df11
Run-time device DFU version 011a
Claiming USB DFU Interface...
Setting Alternate Setting #0 ...
Determining device status: state = dfuIDLE, status = 0
dfuIDLE, continuing
DFU mode device DFU version 011a
Device returned transfer size 2048
DfuSe interface name: "Internal Flash  "
file contains 1 DFU images
parsing DFU image 1
image for alternate setting 0, (1 elements, total size = 272176)
parsing element 1, address = 0x08000000, size = 272168
Download [=========================] 100%       272168 bytes
Download done.
done parsing DfuSe file
This will take a minute or two to do the transfer.
When it’s done, remove the power from the Carbon, and plug it back in again. Start the power normally. Press SYS (SHIFT-MIDI) to check the firmware version.
If you’re updating from v1.02, the first few things that you’ll notice is a new font (I’m not 100% sold on it honestly) and that the Carbon now takes MIDI input from any channel instead of channel 1. There are also a number of bug fixes.
The Carbon also has a Github page, so if you have bugs to report or suggestions to send about the device, that’s the place to do it.
Enjoy your noodling!
