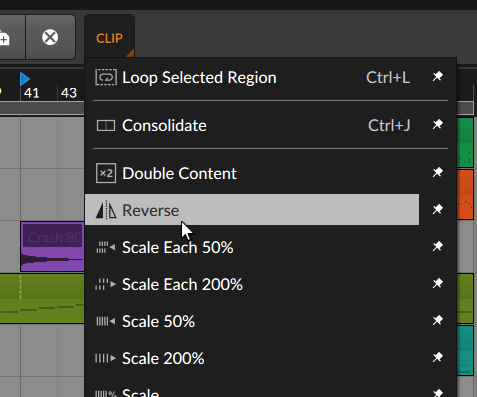
Here’s how to reverse audio in Bitwig:
- Select the audio clip
- Go to the top toolbar and click “Clip”
- Select “Reverse”
Not everything needs to be a five minute YouTube video.
Here’s how to reverse audio in Bitwig:
Not everything needs to be a five minute YouTube video.

CARBON by Kilpatrick Audio
I recently purchased a Kilpatrick Audio Carbon made by Kilpatrick Audio. The Carbon is a multi-track, multi-step sequencer that controls instruments using MIDI and CV. So far, it’s been fantastic and it’s allowed me to start doing loop-based music live.
I’ve been communicating with the author, Andrew Kilpatrick, about some bugs about the device, and he recently released a new firmware update. He doesn’t have a Mac so he’s not able to test the Carbon’s firmware updating process.
For all of you visiting who have a Carbon that needs updating, here’s the instructions for Mac (they’ll also work on Linux).
The Carbon uses DFU for its firmware updates. There are many DFU utilities out there, but an open-source one that works is called dfu-util, which runs on Mac and Linux. (If you’re using Windows instead, instructions exist on the Kilpatrick Audio firmware site).
1. (on macOS) Install home-brew (http://brew.sh). You’ll need Xcode for this (with the command-line tools).
2. (on macOS) Install dfu-util. “brew install dfu-util”
On Linux, the instructions will be different, but will probably involve using your system’s package manager in a similar way.
Download and unzip the firmware from the Kilpatrick Audio firmware updates web site. The latest firmware as of writing is v1.06.
Restart Carbon in firmware update mode. To do this:
The LEDs will be a solid color and the screen will be blank. Sometimes, the LEDs will be different colors. That’s normal.
Open Terminal (macOS) or another command-line window.
In the prompt, type the following to check that the program can see your carbon:
dfu-util —list
Your output will resemble the following:
dfu-util 0.9

Copyright 2005-2009 Weston Schmidt, Harald Welte and OpenMoko Inc.
Copyright 2010-2016 Tormod Volden and Stefan Schmidt
This program is Free Software and has ABSOLUTELY NO WARRANTY
Please report bugs to http://sourceforge.net/p/dfu-util/tickets/

Deducing device DFU version from functional descriptor length
Found Runtime: [05ac:828d] ver=0118, devnum=8, cfg=1, intf=3, path="20-6.3", alt=0, name="UNKNOWN", serial="UNKNOWN"
Found DFU: [0483:df11] ver=2200, devnum=27, cfg=1, intf=0, path="20-4.1.2", alt=3, name="@Device Feature/0xFFFF0000/01*004 e", serial="376837513335"
Found DFU: [0483:df11] ver=2200, devnum=27, cfg=1, intf=0, path="20-4.1.2", alt=2, name="@OTP Memory /0x1FFF7800/01*512 e,01*016 e", serial="376837513335"
Found DFU: [0483:df11] ver=2200, devnum=27, cfg=1, intf=0, path="20-4.1.2", alt=1, name="@Option Bytes  /0x1FFFC000/01*016 e", serial="376837513335"
Found DFU: [0483:df11] ver=2200, devnum=27, cfg=1, intf=0, path="20-4.1.2", alt=0, name="@Internal Flash  /0x08000000/04*016Kg,01*064Kg,07*128Kg", serial=“376837513335"
The Carbon’s device ID is 0483:df11. In this particular case, you want to write to the “alt bank 0”, which is the Carbon’s internal flash.
Install the firmware with the following command:
dfu-util -a 0 -D K66-carbon-1.06-firmware.dfu
You will see output that looks like the following:
dfu-util 0.9

Copyright 2005-2009 Weston Schmidt, Harald Welte and OpenMoko Inc.
Copyright 2010-2016 Tormod Volden and Stefan Schmidt
This program is Free Software and has ABSOLUTELY NO WARRANTY
Please report bugs to http://sourceforge.net/p/dfu-util/tickets/

Match vendor ID from file: 0483
Match product ID from file: df11
Deducing device DFU version from functional descriptor length
Opening DFU capable USB device...
ID 0483:df11
Run-time device DFU version 011a
Claiming USB DFU Interface...
Setting Alternate Setting #0 ...
Determining device status: state = dfuIDLE, status = 0
dfuIDLE, continuing
DFU mode device DFU version 011a
Device returned transfer size 2048
DfuSe interface name: "Internal Flash  "
file contains 1 DFU images
parsing DFU image 1
image for alternate setting 0, (1 elements, total size = 272176)
parsing element 1, address = 0x08000000, size = 272168
Download [=========================] 100%       272168 bytes
Download done.
done parsing DfuSe file
This will take a minute or two to do the transfer.
When it’s done, remove the power from the Carbon, and plug it back in again. Start the power normally. Press SYS (SHIFT-MIDI) to check the firmware version.
If you’re updating from v1.02, the first few things that you’ll notice is a new font (I’m not 100% sold on it honestly) and that the Carbon now takes MIDI input from any channel instead of channel 1. There are also a number of bug fixes.
The Carbon also has a Github page, so if you have bugs to report or suggestions to send about the device, that’s the place to do it.
Enjoy your noodling!
The final results are in for Ludum Dare 26, a game competition in which participants have 48 hours to program a game from scratch. As I previously wrote, I participated in Ludum Dare for the first time last month and learned an immense amount in an extremely short amount of time. Here are the ratings I received for Painter’s Cat. The ratings were out of 5, and there were 1610 games submitted to the Compo category (which I participated in).
 |
Coolness | 60% |
| #47 | Audio | 3.85 |
| #176 | Innovation | 3.64 |
| #187 | Humor | 2.96 |
| #219 | Mood | 3.33 |
| #265 | Theme | 3.87 |
| #457 | Overall | 3.26 |
| #569 | Graphics | 3.00 |
| #700 | Fun | 2.82 |
(For those who are wondering, Coolness is a measure of how involved you are in the community, especially with playing, rating, and leaving comments on other people’s games. The more you play and comment and rate other games, the higher your coolness is).
First of all… I’m in the Top 100 for Audio at #47? Holy crap. That’s amazing. I’m pretty blown away by this – all of that time doing One Hour Compos has really paid off! I couldn’t find where my overall ranking was, but it looks like I managed to place in the top 40%, which isn’t bad for a first game.
Ludum Dare was an amazing positive experience for me overall. I’m pretty excited for next time. There’s still a lot for me to learn and this is one way to help me not only learn about software development and game development, but to also have fun doing it.
Our submission to the ACM Conference on Human Factors of Computing was accepted a while ago. As part of that submission, we were also required to create a video preview for the conference.
This presented to us a few logistical problems. First, none of us had camcorders. We had iPhones, which can record video in a pinch, but that can be rather spotty as far as recording goes. Second, we did not have a lot of time in which to arrange to do principal photography or other setups that would require fieldwork. The CHI video is not particularly long – under one minute – but it still requires us to know what we’re shooting, and to ensure that we can do this all in a clean, professional manner. When you have a week, and when you’re also considering the camera-ready version of a paper, trying to direct a video is a lot of work on top of that.
We decided to take a simpler route and use an animated video instead. This presented its own suite of problems. The first one was that no one on our team had computer-based animation experience in Flash or other art tools. Thus, it was up to us to figure out how we could do this nicely with inexpensive, off-the-shelf software.
First, here’s the video…!
And here’s the preprint of the paper! D. Piorkowski, S. D. Fleming, I. Kwan, M. Burnett, C. Scaffidi, R. Bellamy, J. Jordhal. The Whats and Hows of Programmers’ Foraging Diets, ACM Conference on Human-Computer Interaction (CHI), Paris, France, 2013.
If you want to make an animated video and don’t know other animation tools, you can build something reasonable in Apple Keynote and iMovie! With some high-resolution graphics, transitions and Keynote actions, good builds, and a high-resolution export, we were able to create something that, while it’s not going to win us any awards, serves as a presentable video preview.
I used Apple Keynote 5 because it exports high-frame Quicktime movies. I tried to use PowerPoint on various systems, but it exported movies that were not at a high-enough framerate to animate transitions properly.
The main workflow works like this:
It should be noted that if you do happen to know how to use a professional animation and video tool like Adobe Flash, Adobe Premiere, Apple FInal Cut Pro, etc., you should use those tools instead! This guide is meant for people who don’t have time to learn a real animation suite or don’t have something to field or screen-record.
We decided to use an animated figure doing some actions, some text-based transitions, and a voiceover. These won’t get us the “CHI video preview of the year”, but they’ll communicate the idea across! David, in this case, drew a few initial pictures that I used for the basis of the video.
He gave me static images, so the first thing I did was use an image editor to cut out the hands to “animate” them. I believe that’s the extent of the actual hand-drawn animation in the video. The other main animation that you see is the IFT “magnifying glass”, which is animated using Keynote’s build effects.
Here are some tips:
Even if you get all of your timings right within the presentation itself, the Quicktime movie that Keynote exports will still not have good timings. This is simply due to limitations with frames per second and how fast you can get transitions to fire in Keynote. You’ll want to edit the resulting file in iMovie.
My colleague David recorded the audio. I asked that he use a headset and that he record in a quiet room. Doing so will save you a lot of headaches! If possible, you want to record in a reasonably small room without any noises (closets and bathrooms work great in an emergency!). I don’t know how long it took him to record the video, but it was a reasonably clean recording.
I used Audacity, an open-source program, for my audio editing. I personally sliced up the audio into separate sentences, it made it easier to match the beginning of each sentence to the actual transition. I also took the time to edit out any “ums” or “ers” that were in the reading. His voiceover was pretty good overall but I was able to fine-tune it.
Once that is done, you have to match up the audio with the video in iMovie. This is a reasonably tedious, manual process. iMovie is accurate to something like a tenth of a second, and likes to nudge things to the closest 0.4 seconds, so you do want your video to be liberal enough to not go up against these limitations. Use the “clip adjustments” and “audio adjustments” settings. If necessary, slice up the audio into smaller segments and drag and drop them into iMovie at the right points to fine-tune.
I added music to my video. Be aware of licensing arrangements! When you submit a video to the ACM, they require you to have proof of copyright usage of any media, which includes the video and music. In my case, I asked permission from the original author. (The track, by the way, is called World of Snow by DDRKirby(ISQ)).
One thing you don’t want is for your music to drown out your speaker. iMovie almost automates this process, though! There’s an iMovie feature called “ducking” that reduces the volume of the music while someone is talking – this is a common radio technique. For all of your voiceover tracks, set them to “duck other audio tracks” to a small value, like 8%. If you happen to have any gaps in your voiceover, you may need to insert some silence so that your audio doesn’t duck in and out while your speaker pauses.
I am by no means a professional video editor. No one on our paper-writing team was! That was what led us down this path to creating a short video on the cheap, but the reality is that a lot of people out there aren’t professionals, and many had not ever edited a video clip or tried creating a movie. I think this just underlines the fact that researchers in any discipline have to have a large number of diverse skills, and require the ability to be resourceful and adaptable. We couldn’t afford the time or energy to go shooting video or learning video-editing software, but we also wanted something that was reasonably engaging and that would stand on its own!
I hope that some of the content on this particular post will help some others out there who are working on brief video clips or previews of their own content, be it research papers or other work. Enjoy!
