Monthly Archives: March 2021

Using the Sampler in Logic Pro X to Play and Slice Audio Samples

Let’s say you need an instrument that will play back recorded effects, slice drum loops into segments, automatically shift the pitches of sound so they’re always in key, and cut out bad “pops” other undesirable parts of a sound. Oh, and you also want it to play cool gating effects. What instrument would you use? The answer, of course, is a sampler. A sampler loads up recorded audio files and does some basic processing on them so that you can use them as an instrument.

I’ve never really been big into samplers. I started doing music after trackers were going out of style but before scripted sampling engines became big. As a result, I never really paid much attention to the “simple” sampler where you dropped in a sound file and had it play it back for you.

I want to walk you through using a sampler using Logic Pro X’s “Quick Sampler” because it’s, well, quick. The Quick Sampler was released as part of Logic’s 10.5 update and it’s fast and easy to incorporate samples into your music composition! However, even though the instructions here are specific to Logic, almost all samplers support these concepts.

Loading Samples

Drag and drop the sound directly from the Finder into the track header. Release the button and it’ll give you an option for what to do with the sample:

Drag and drop the sample from your filesystem into Logic’s tracks to create a Quick Sampler.
  • Original: Use the sound as-is. Great if you want to just play the sound back at different pitches using the piano roll.
  • Optimized: Analyze the sound and do a bunch of magic to set the sampler up around the type of sound you loaded in.

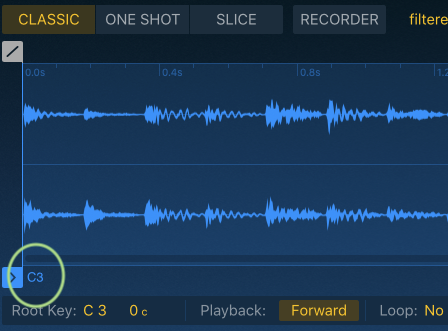
You can audition your sound with the tiny little play button under your sample, or you can use the piano roll and play the sample back (the default note is C3). For most sounds, the sound will play back as long as the note is held.

If you mouse over the note name here, the icon actually turns into a “Play” button that will audition your sample. It’s a little hidden.

Play Your Sample Like an Instrument

One of the great features of samplers is making the sample work across all kinds of different pitches and with all kinds of note lengths. You can change a quick snappy trumpet note into a long drone or pitch a really low-pitched sax into a high-pitched sax.

Load your sample and set it to “Classic” mode. The short version of how this works is that the sample plays as long as the note in the piano roll is held down (the longer answer is that the sample follows the amp envelope). Next, look for the loop points. If you hold the note down for longer than the sample’s length, then the sampler will loop across this range.

To make the loop sound good, you don’t want clicks or pops when you go from the end to the beginning. This means that you generally want the loop points to hit a point called a “zero crossing” (which is represented by the line). Fortunately, Quick Sampler makes it pretty easy to snap the loop points to zero crossings. Under “Snap”, choose “zero crossing”. Next, you want to set your loop so that the sound is as continuous as possible. To do that, you can zoom in on your sound’s waveform and imagine that you’re drawing a line from the end back to the start without an abrupt change in direction.

You want to set the loop points so that the waveform at the loop end and loop start cross from positive to negative (or negative to positive) through the zero crossing to avoid clicks or other sound artifacts.

The following video demonstrates some of the differences in the sound when you don’t snap to zero crossings, when you don’t match the waveform’s direction, and when you do line everything up.

Demonstrating how to use loop points on a sample to reduce clicking.

One Shot: Play The Entire Sound!

If you want your sample to always play back in its entirety, then use “One Shot”. This is best for drum sounds or sound effects where you always want the entire sound to play.

Slice Your Sample

A long-standing music production technique is harvesting drum loops from recordings, slicing them up, and then using them in different ways in your own music. This is not only fun, but it allows you to get some really interesting effects.

If you want to play each drum hit separately, you can use the “Slice” option in Logic. When you click it, it automatically cuts your tracks by transient and assigns it a note, and then you can use the note to play back each piece. Here’s a filtered hi-hat loop you can use to follow along with.

This sequence plays back each hit in the loop one at a time.

You can choose different ways for Quick Sampler to automatically cut your track up:

  • Transient: Cut your track using the sound as a guide – essentially, it tries to put each hit in its own region that can be played back with a note.
  • Beat divisions: Cut your sample into slices based on the tempo from your DAW.
  • Equal: Cut your sample into a specific number of slices. This is really useful if you know the BPM of the original sample and how frequent the hits are.
  • Manual: Manually slice your sample by hand.

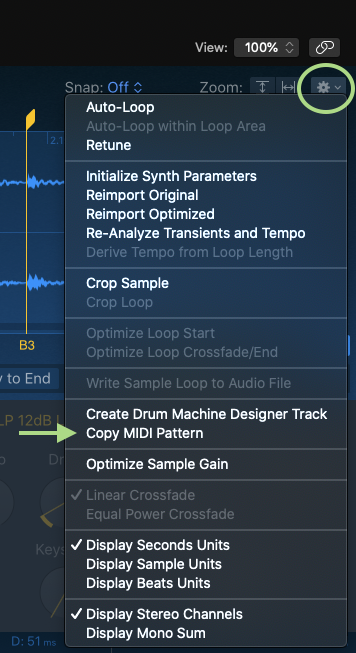
In each of these cases, you can use the gear menu to copy the MIDI pattern and paste it as a region on your track. When you play it back, it should sound like the original.

Copy, then paste the MIDI Pattern to quickly play the sound in the region

With the region, you can move MIDI notes around to play the different hits in unique ways or even to gate parts of a sample! In the example video below, I use this technique to chop up a vocal.

Using “slice” and the piano roll to gate parts of a sample.

Recording Instantly From Logic

I’ve been talking a lot about how to load and manipulate samples that you already have, but what if you don’t have any suitable samples to work with? The Sampler makes it easy to create your own!

Using Quick Sampler’s “Recorder” mode, select an input source (which could be from your audio inputs, but it could also be from an instrument track in Logic). Press the red “record” circle, and then play the sound in the DAW. You’ll see the audio come through into the sampler. Press “Stop”, then select an appropriate mode for playback. You will likely need to edit the start and end points of your sample (hint: if it’s a loop, you might find Snap: Beat helpful).

Recording a baseline from Instrument 3 into the Sampler. You need to manually stop the sample and then trim it down at the end.

Why would you resample from your DAW when it’s already playing the sound? The cool thing about resampling is that you can chop up the result for some very interesting effects. Resample your voice and pitch it up or down for some robotic dystopia. Slice a loop up to gate and glitch it. Record some drums with huge reverb, but then gate the reverb out. There’s a lot of interesting things that you can do with samples even directly in the sample editor.

Let Quick Sampler Do The Work For You

When you load a sample into Quick Sampler, it asks if you want to use Original or Optimized mode. What’s the real difference? Optimized mode will attempt to auto-detect the nature of the sound and then tailor the sampler’s settings based on what it thinks works for the sound. It will:

  • Try detecting the pitch and put the sound on the corresponding note
  • Set the start and end so that it skips silence
  • Set loop points automatically
  • Slice the sample into drum hits if it’s a drum loop

Quick Sampler modulation and other sound-shaping devices

In addition to manipulating the sample itself, you can modify a number of pitch, filter, and amp envelope options. You can use these to creatively shape the sample to your needs! If you want a lush pad, for example, you could increase the attack on the filter envelope and increase the amp envelope release.

The sampler also contains a number of modulation options. Access the “Mod matrix” to see a list of possible controls, then map them so that you can control them from the piano roll or your MIDI controller.

If I’m drawing MIDI notes on the piano roll, then I like to map velocity to a target for some easy ways to introduce variety.

These features are part of almost every sampler!

Now you know more than enough to have fun with your samples. I like Logic’s Quick Sampler because it’s so easy to get started, but pretty much every DAW, and even hardware sampler, uses the same concepts in this post. From slicing to ADSR to zero crossings, you’ll be able to figure out any sampler!

Advertisement
https://www.flickr.com/photos/111456865@N04/11357509244

How to Compose Music Without Playing an Instrument or Knowing Music Theory

Have you ever wanted to write your own pieces of music? It’s easier to start learning music composition than you might think.

I’m a mostly self-taught composer, and I’ve never learned to play any instrument well enough to be proficient at it. I remember wanting to learn how to compose songs in 2003 and then getting stuck with thinking about the tools required and the skills required. I used to think that you needed to learn music theory, and that you HAD to learn to play with a piano keyboard.

You do not need to know any of that to compose! These days, with digital tools, you can start writing basic songs with only a mouse, and listen to them immediately to see if you like what you hear. I’m going to help you get started with composing just enough so that you can try a few things on your own and get some experience so that more advanced tutorials make sense.

I used to think that you needed to learn music theory, and that you HAD to learn to play with a piano keyboard. You do not need to know any of that to compose!

I’m going to assume that you are using a digital audio workstation (DAW) such as FL Studio, Garageband, Reaper, Ableton Live, or Logic Studio. There are many guides about how to choose a DAW, so I won’t cover that topic and focus primarily on the art of composing itself.

Melody and Harmony and Backing Rhythm

The first thing to be familiar with when composing is the layout of the piano keyboard and scales, even if you don’t plan on ever learning piano. This is because almost every DAW uses a piano roll to represent notes, where a piano is on the left. That said, if you’re just starting out, the only notes you need to worry about right now are the white keys. Horizontally, you can see when the note starts, and its duration. The numbers across the top represent bars (you can see 1-2-3-4). The smaller grid lines are subdivisions. A whole note covers one bar. A half note covers half of the bar. A quarter note covers a quarter of the bar. An eighth note covers 1/8 of the bar.

A melody in C major. We use the white notes to stay in key. The melody starts with a whole note, two half notes, four quarter notes, and ends with a whole note.

For creating melody, learn two scales: the major scale, and the minor scale. The major scale is essentially do-re-mi-fa-so-la-ti-do and can be played on the white notes starting with C to make “C D E F G A B C” (C major scale). The minor scale is played on the white notes starting with “A” (two white notes below C) and goes “A B C D E F G A” (A minor scale).

The C major scale starts on C and ends one octave higher. The “3” indicates the octave (so C4 is higher than C3).
The A minor scale starts on A and ends one octave higher. Note that even though the order of notes is the same, the sound of the melody is quite different if you start and end on A than if you start and end on C.

For most melodies, if you riff on the white keys, and either start, or end the melody on “C” for major, or “A” for minor, then you’re going to get something that cannot be out of key and will probably sound fine.

For creating harmony, you will want to learn chords. A chord is made of three specific notes played at the same time. For the raw basics, you would want to learn the 1 chord, the 4 chord, and the 5 chord. Once you get used to those, add in the 6 chord. Here’s a chart for what the chords are for the C major scale and the A minor scale.

Chords for C majorChords for A minor
I chord: C-E-G (C major)i chord: A-C-E (A minor)
IV chord: F-A-C (F major)iv chord: D-F-A (D minor)
V chord: G-B-D (G major)v chord: E-G-B (E minor)
vi chord: A-C-E (A minor)VI chord: F-A-E (F major)
Basic chords to get started with the C major scale and A minor scales. The “I” is a Roman numeral I. Technically, there’s a difference between the capital I and the lowercase i, but we can save that for when you want to learn music theory.
The 1, 4, 5, and 6 chords for the A minor scale. To draw a chord, start with a note on the scale, then skip a white key, draw the next note up, skip a white key, draw the next note up.
The 1, 4, 5, and 6 chords for the C major scale. There is actually a difference between the capital Roman numerals and the lowercase ones – capitals are “major” chords and lowercase are “minor” chords. If you listen to a major chord compared to a minor chord, they sound very different.

Using the 1-4-5 chords, a nice chord progression across four bars is 1-1-4-5. You can try many different variations of this, like 1-1-5-5, 1-4-1-5, and so forth. If you add the 6 chord, you have the harmonic foundation for a gigantic number of pop songs with the I-V-vi-IV progression.

For rhythm, learn some basic drum patterns. A basic to start off would be:

  • Kick drum on every beat: 1-2-3-4
  • Snare drum on every second beat: 2-4
  • Closed hi-hat on every 8th beat: 1-&-2-&-3-&-4-&

Writing in your DAW

If you have this, the next step is to sit down at the DAW and start writing. Choose some instruments that sound good to you. Good choices are piano and square wave synth sounds because they sound good across many octaves.

A solid template to start your composition from would be:

  • One lead track to play the melody
  • One midrange track to play the harmony
  • One low track to play the bass
  • Drums

Play your melody in the melody line following the major or minor scale. Play the harmony in the midrange track and assign it a chord progression of your choice. For bass, you can usually draw the lowest note from the corresponding chord, make it short, and then repeat it and move it around for some groove. Copy and paste this and add a few variations.

A template for a first song using Garageband (but you can use any software that you want). You can choose any instruments that sound good to you. Usually, DAWs will provide presets labelled “lead” that are good for melodies, “pad” or “rhythmic” for harmonies, and “bass” for bass. For drums, the keys correspond to different drum sounds depending on the drum kit that you select.

Now you’re composing!

Eventually, you’re going to grow out of this template. You’ll start using open hi-hats, breakbeats, syncopated rhythms, jazz harmonies, crazy stacked synths, three kick drums, alternative modes, an entire orchestral string section with borrowed chords, and more. But when you’re just starting out, I like to give people a relatively constrained set of parameters to work with initially because it helps you get something down on the paper. Once you get it down and you can press “play” and hear something that sounds not too bad, you can start making tons of variations and basically start having fun overall with it.

I like to give people a relatively constrained set of parameters to work with initially because it helps you get something down on the paper.

Set Realistic Expectations!

When you are writing, your first few songs will sound bad. They won’t be epic like Howard Shore or floor-busting like Skrillex. Just accept it. Actually, to be honest with you, when you first start out, your first few songs are going to sound AMAZING and you’ll want to show all of your friends, but then you’re going to realize just how wrong you were about it half a year later.

The point is, it takes a lot of practice if you want to make songs that sound like your favorite songs. This is where analysis and theory comes in – you also want to know how to listen and study existing music and put it into a framework where you can put it on your page. You will get there eventually. Until then, embrace making music that sits within your own parameters until you get the skills up. There’s a lot to learn, but it’s also important to have fun with the process!

Learn and Practice With Others

As you learn the skills, you need an opportunity to practice them regularly, in a way that is encouraging and motivating in order to get good.

I highly, highly recommend that you Join a community where you can compose, share your work, and get feedback. I plug One Hour Compos a lot for new and experienced producers alike. The compo starts at 9:00 P.M Eastern time and runs for a little over an hour, and then everyone listens to the songs afterward and comments in real-time. This is extremely valuable because it’s not a huge time commitment, you get to practice, and you get real-time feedback from the ThaSauce Network Discord. In addition, since you’ve only spent an hour on it, no one has any expectation that what you’ve created is complete or polished.

There’s lots of variations of this (Two Hour Track Sunday, WeeklyBeats, Weekly Music at streak.club, Mix Challenge, 90 Minute Compo, etc.). No matter what you’re doing, if you’re doing it every week, and you have people listening to your work and leaving you their impressions, you’re going to improve much faster than if you’re doing it on your own.

If you’re doing it every week, and you have people listening to your work and leaving you their impressions, you’re going to improve much faster than if you’re doing it on your own.

Your Next Steps

What happens next? First, create some music. Get used to the process of choosing some instruments, writing some notes on the page, and listening. Compose some melodies, listen to how the different chords and rhythms sound, and learn how different instruments sound. Join compos like One Hour Compo. Ask me questions in the comments and let me know about topics you want to learn more about. Not everything is going to sound good. That’s okay. You’re learning a new skill – one that takes many hours to develop! Remember that it’s about the journey – your journey – not the results.

When you start getting comfortable, a good next step is to start learning music theory to form a foundation from which to understand more music composition concepts. There are a lot of resources out there, but I particularly enjoy Hack Music Theory for its simple explanations, its solid foundations, and easy-to-apply techniques.

I really enjoy talking about music composition and music technology. You can reach out to me on this blog or through Discord (EmeraldArcana#7200). Check out my compositions on my YouTube channel!